Соленые помидоры с морковной ботвой: Помидоры с морковной ботвой на зиму
В собственном огороде, полезна но только своим сочным и красочным корнеплодом. Надземные части растения издавна используются в кулинарии, для придания особого вкуса пище. Из-за высокого содержания витаминов, микро- и макро-элементов, зелень моркови широко применяется и в народной медицине, гинекологии и косметологии. Она помогает бороться с недугами мочеполовой системы, с насморком и простудой, аллергией, стоматитом и др. заболеваниями. Ежедневное потребление морковной ботвы снимает воспалительный процесс в организме и повышает защитные функции иммунной системы.
Чем полезна морковная ботва и как ее применять в домашних условиях, читайте подробнее в статье.
Химический состав
Морковная ботва — это надземная часть растения, которая представляет собой листья, вышедшие из прикорневой культуры. Они имеют длинные черешки, ярко-зеленый окрас, и мягкую, неравномерную поверхность. Листья рассечены на несколько долей в виде треугольников, что придает пучку красивый ажурный внешний вид.
Зеленая часть моркови считается одной из наиболее полезных. В листьях содержатся уникальные химические соединения, которые, по консистенции, превышают количество в самом плоде в более чем 100 раз. Этим и обусловлено преимущественное применение морковной ботвы в народном целительстве.
Лечебные свойства морковной ботвы известны человечеству уже более 4 тыс. лет. В средневековье этой частью растения украшали прически и платья. Современные хозяйки также часто используют зелень в кулинарии, для приготовления солений и маринадов. Ученые, в свою очередь, полагают, что одна веточка моркови, съеденная за день, способна существенно улучшить здоровье, снабдить организм всеми необходимыми витаминами и минералами, тем самым и защищая от хронических заболеваний и злокачественных опухолей.
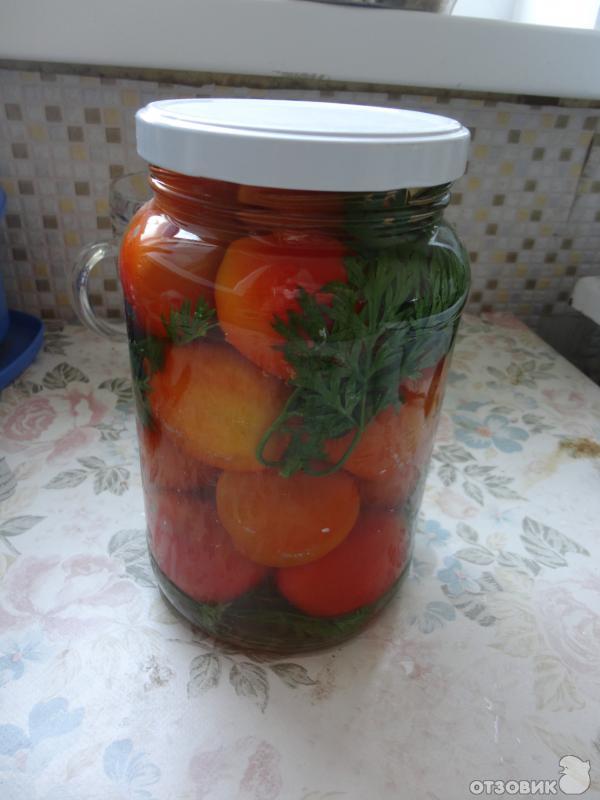
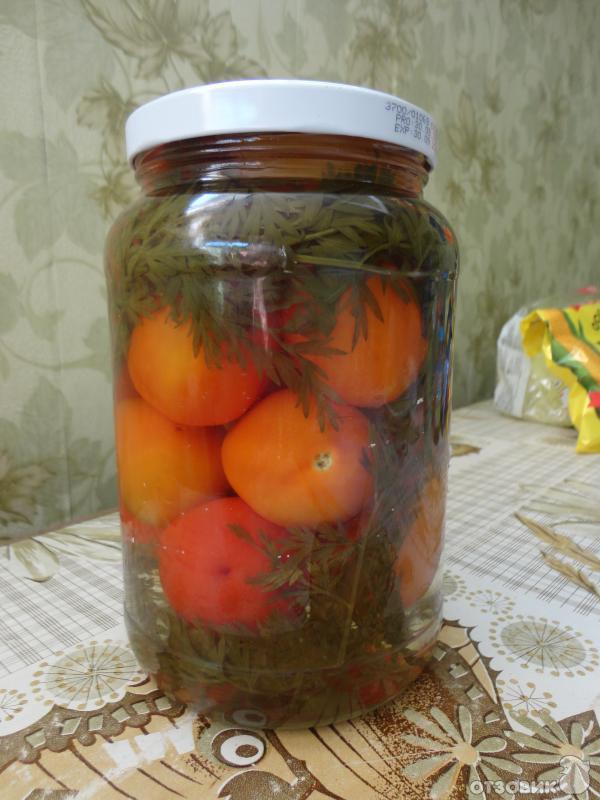
В моей коллекции заготовок есть и огурцы, и помидоры с перцем, но вот с маринованными помидорами на зиму с морковной ботвой я столкнулась впервые в прошлом году. Рецепт я нашла где-то на просторах интернета, и он очень меня заинтересовал – мне показалось, что это должно быть очень вкусно. Так что я закрыла пару баночек на пробу. И результат мне очень понравился: помидоры получаются очень интересные, не совсем обычные, но вкусные.
Новый рецепт из помидоров на зиму
И в этом году я закрыла снова несколько банок – мне кажется, это отличный вариант, чтобы разнообразить привычную консервацию из помидоров. А еще сама зелень морковки выглядит очень эффектно – она красивая, яркая, так что и баночки с помидорами, маринованными с морковной ботвой, будут очень аппетитными.

Ну, и что касается сложности приготовления – в этом плане помидоры меня тоже не подвели: весь процесс довольно простой: надо лишь подготовить помидоры, ботву и прочие специи, залить маринадом и поставить стерилизоваться. Более подробно, как мариновать помидоры с морковной ботвой, вам расскажет мой пошаговый рецепт.
Ингредиенты на 1 л банку
- 450-500 г помидор;
- 3-5 веточек морковной ботвы;
- 2 горошины черного перца;
- 0,3 см колечко горького перца;
- 2-3 зубка чеснока;
- 0,3 см колечко корня хрена.
Для маринада
- 4,5 л воды;
- 9 столовых ложек сахара;
- 4,5 столовых ложек соли;
- 200 мл 9% уксуса.
Как консервировать: шаг за шагом
Помидоры для маринования выбираем спелые, но плотные, без поверхностных повреждений. Желательно выбирать небольшие плоды сливовидной формы: их больше помещается в банку и, как правило, они меньше растрескиваются. Если помидоры крупнее, их в банку войдет меньше, тогда, соответственно, потребуется больше маринада. Помидоры промываем холодной проточной водой.
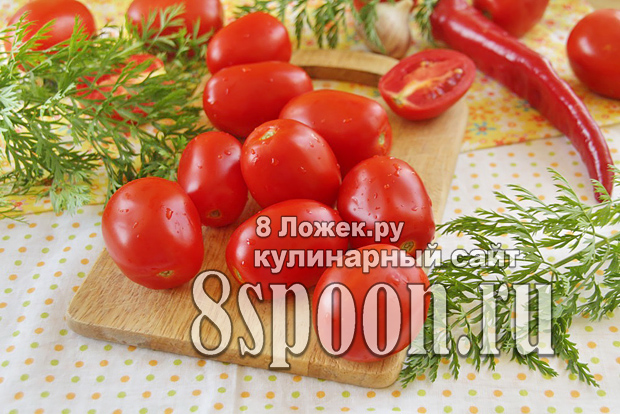
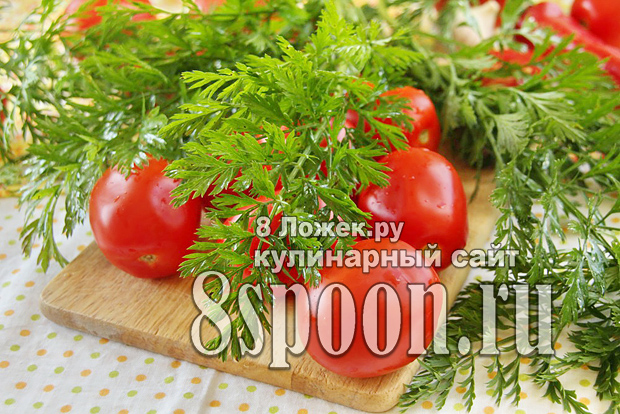
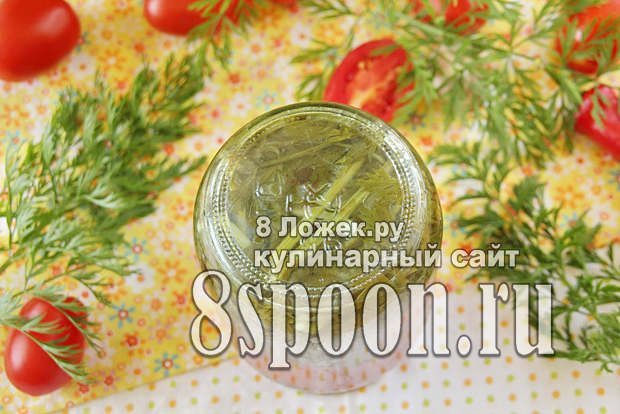
Тщательно промываем морковную ботву и раскладываем на салфетке.
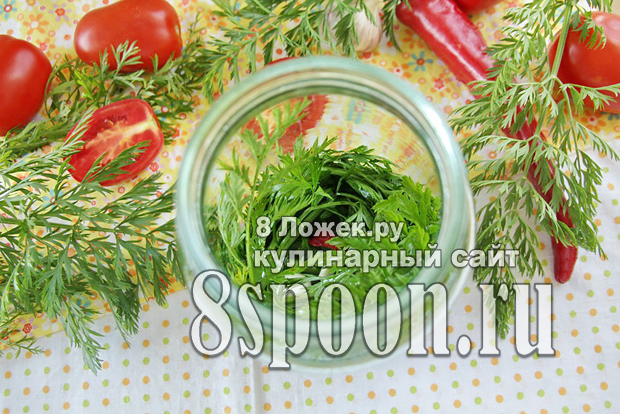
Корень хрена и чеснок очищаем и тщательно промываем. Нарезаем тонкими колечками хрен, а зубки чеснока разрезаем пополам. Промываем горький перец и нарезаем его тонкими колечками. На дно заранее простерилизованных банок кладем морковную ботву, чеснок, горький перец и перец горошком, корень хрена.
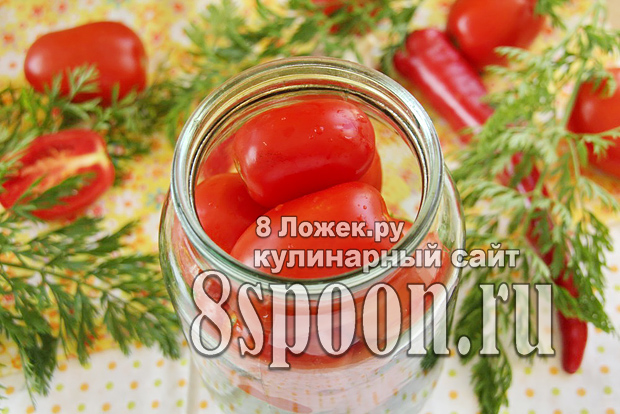
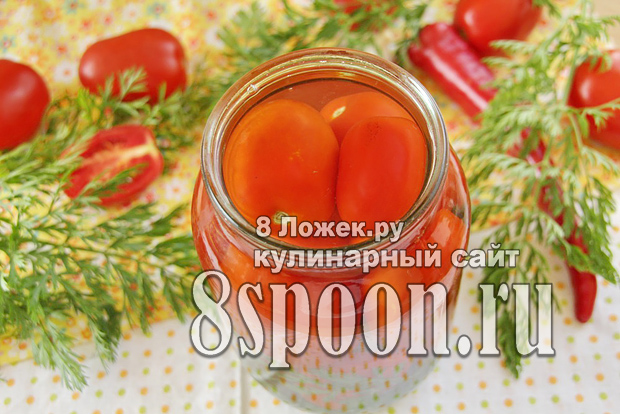
Укладываем помидоры, стараясь не приминать и разместить рационально, чтобы осталось меньше пустот. Банки с помидорами прикрываем крышками, чтобы не попадала кухонная пыль.
Для маринада в кастрюле доводим воду до кипения, насыпаем соль и сахар и, помешивая, варим 2-3 минуты, до полного растворения кристалликов. Наливаем в маринад уксус и отключаем огонь. Кипящим маринадом осторожно заливаем банки с помидорами, наполняя их до верха.
Тонкости стерилизации заготовок
Снова прикрываем банки крышками и ставим в кастрюлю, дно которой выстлано салфеткой (чтобы не лопнули банки во время стерилизации). Банки с помидорами заливаем водой так, чтобы она доходила до плечиков банок. На большом огне доводим воду в кастрюле до кипения, затем огонь немного уменьшаем, чтобы не было чересчур бурного кипения, и стерилизуем в течение 15 минут.
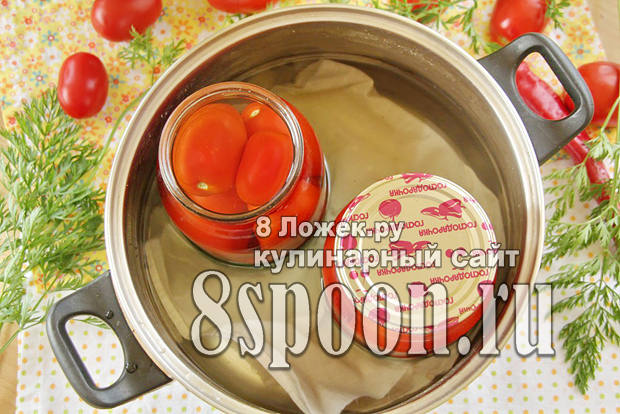
После стерилизации банки с помидорами осторожно вынимаем из кастрюли (удобно воспользоваться специальными щипцами-прихватками) и герметично укупориваем. Банки с помидорами переворачиваем вверх дном и выдерживаем до полного охлаждения.
Остывшие помидоры переносим на постоянное место хранения, можно при комнатной температуре.

Советы и рекомендации к рецепту
Приведу вам расчет маринада для помидоров с морковной ботвой на литровую банку (мне кажется, такой объем – самый подходящий для этих помидоров):
Маринад на 1 литровую банку
- 0,5 л воды;
- 1 столовая ложка сахара;
- 0,5 столовой ложки соли;
- 22 мл 9% уксуса.
4.5 / 5 ( 6 голосов )
Попробовав эти помидорки один раз, непременно захочется ещё! Может дело в помидорной ботве, а может в несколько необычном — сладком — маринаде, но нравятся они абсолютно всем.
Итак, приступаем… Моем банки и помидоры. Каждую помидорку прокалываем зубочисткой или шпажкой, тогда при нагревании воздух из них свободно выходит и помидорки не лопаются. Кто-то посчитает это лишним, но я делаю так всегда (даже если консервирую два ведра), хороший внешний вид — уже полдела.
Укладываем в банки помидоры вперемешку с морковной ботвой — те самые хвостики, «коса на улице», которые обычно выбрасываются. На 1 литр объема 1-2 шт. ботвы. НИКАКИХ ДРУГИХ СПЕЦИЙ! Этот рецепт не для проявления инициативы!

Заливаем кипящей водой, даем постоять практически до остывания (а можно и до остывания).
Сливаем воду, на 1 литр жидкости добавляем 4 ст. ложки сахара, 1 ст. л. соли, 70 г столового уксуса (6%). Покипит минутку, заливаем помидорки, закатываем, переворачиваем до остывания. Можно закутать одеялом, но это кто как привык…
Вкуснейшие, нежнейшие помидорки готовы! Приятного аппетита!
Рецепт прост, позволяет консервировать «между делом». Единственная трудность — иногда нелегко достать морковную ботву. Я прошлым летом специально на рынке с бабульками договаривалась, в этом году на даче посадила грядку моркови специально на ботву.
Помидоры с морковной ботвой: секреты заготовки на зиму
5 (100%) 3 голос[ов]Морковная ботва всегда выбрасывается без сожаления. И совершенно напрасно – ученые выяснили, что по содержанию полезных веществ листья моркови ничуть не уступают самому корнеплоду. К тому же у нее приятный аромат и аппетитная декоративность. В домашних заготовках б
Помидоры На Зиму С Морковной Ботвой: 4 Рецепта
Зима нагоняет уныние из-за отсутствия ярких красок. Но каждая женщина немного волшебница! Почему бы нам, волшебницам, не привнести летние краски и ароматы в зимние обеды и ужины? Помидоры на зиму с морковной ботвой – ароматные, вкусные и богаты витаминами, а приготовить их совсем нетрудно.
В этой статье мы собрали для вас целых четыре рецепта помидоров на зиму. Солёные, сладкие, кисловатые – на любой вкус!
Для заготовки лучше брать помидоры нескольких сортов – мелкие и крупные. Так вы сможете более плотно заложить банку, не оставив пустых мест. Оптимально брать плоды средней спелости, они и не лопнут и не развалятся. Для надежности можно сделать в томатах несколько проколов зубочисткой, тогда они точно не лопнут от заливки кипятком.
Собранные или купленные помидоры переберите, осмотрев на предмет гнили и трещинок. Промойте холодной водой и дайте высохнуть. После этого можно выбирать рецепт и приступать к готовке.
Маринованные помидоры с морковной ботвой без стерилизации
Сладкие помидоры по вкусу больше похожи на ягоды или фрукты, поэтому придутся по вкусу даже самым привередливым детишкам.
Чтобы сделать четыре трёхлитровые банки помидоров по этому рецепту вам понадобится:
- 6 кг среднеспелых помидоров;
- 200-300 гр морковной ботвы;
- 400 гр сахара;
- 100 гр соли;
- 5 стопки уксуса (23 столовые ложки).
Процесс приготовления:
Тщательно вымойте банки, заодно проверьте, чтобы в них не было трещинок. Поставьте вверх дном и дайте высохнуть.

В каждую банку положите морковную ботву. Пучок должен полностью закрывать дно. Сверху выложите помидоры. Старайтесь класть плотно, не оставляя пустых мест, иначе все помидоры могут не поместиться.

Вскипятите пять литров воды. Разлейте воду по банкам под завязку, оставив до горлышка буквально пару миллиметров. Прикройте банки металлическими крышками (не завинчивая), накройте полотенцем и оставьте на 30–40 минут.
Внимание! Чтобы банка не лопнула – лейте кипяток на помидоры и делайте это медленно
Вылейте воду из банок обратно в кастрюлю. Высыпьте в неё сахар, соль и вскипятите. Добавьте уксус, хорошенько перемешайте.

Разлейте рассол по банкам и закатайте их. После чего банки нужно поставить в тёплое место, под одеяло на сутки.

Готовые помидоры желательно хранить в прохладном месте, например, в погребе или на балконе.
Помидоры на зиму с морковной ботвой и аспирином
Маринованные помидоры – классическое блюдо на новогоднем столе. Детям, возможно, этот рецепт понравится меньше предыдущего, но более старшие члены семьи его непременно оценят.

Чтобы сделать рассол на трёхлитровую банку вам понадобятся следующие ингредиенты:
- 2 ст. л. соли;
- 6 ст. л. сахара;
- 90 мл уксуса;
- 3 таблеток аспирина;
- пряности по вкусу.
Простерилизуйте банки в посудомоечной машине или любым другим способом и приступайте к готовке:
- На дно каждой банки положите лавровый лист, несколько горошин чёрного перца, две — три гвоздички и немного душистого горошка. Пряности можно заменить любыми или вообще не добавлять, однако, мы рекомендуем именно это сочетание.
- Разложите по банкам морковную ботву и помидоры. В каждую банку положите соль, сахар, аспирин и уксус.
- Залейте банки кипятком под самую крышку и закатайте. Потрясите, чтобы сухие ингредиенты растворились.
Важно! Укутайте банки одеялом и держите в тёплом месте до полного остывания, а иначе впоследствии они могут лопнуть.
Если вы не хотите использовать аспирин – заливайте кипяток дважды, как это было описано в предыдущем рецепте.
Солёные помидоры с морковной ботвой без уксуса
Уксус – хороший консервант, но некоторым не нравится его вкус. Однако это – не проблема! Сделать помидоры на зиму можно и без уксуса, и без аспирина и без лимонной кислоты. Томаты по этому рецепту необходимо хранить в холодном месте, иначе они испортятся очень быстро. Зато блюдо полностью натуральное.

Для одной трёхлитровой банки вам понадобятся:
- 2 ст. л. сахара;
- 2 ст. л. соли;
- 3-4 зубчика чеснока;
- 2 зонтика укропа;
- 7-10 горошин чёрного перца;
- 2 листка хрена;
- 5-6 листков вишни.
Вы можете положить другие пряности, если вы уверены в своих кулинарных способностях. Если же не готовы рисковать – строго следуйте рецепту.
1. На дно стерилизованной банки положите пряности. Чеснок и листья хрена измельчите. Пучок морковной ботвы помните и положите в банку так, чтобы она полностью закрывала дно.

2. Плотно выложите помидоры, сверху насыпьте соль и сахар. Залейте кипятком под горлышко.

3. Закройте банку пластиковой крышкой и укройте до полного остывания.

Готовя по этому рецепту важно не закатывать банку в течение двух месяцев, пока идёт процесс соления. Хранить помидоры нужно в прохладном месте, лучше всего в холодильнике, так как сильного консерванта в маринаде нет.
С лимонной кислотой — рецепт в домашних условиях
Лимонная кислота на вкус приятнее, чем уксус, но в тоже время является довольно сильным консервантом. Замаринованные по этому рецепту помидоры точно не испортятся и будут радовать вас всю зиму. Сочетание пряностей придаст томатам пикантный и интересный вкус.

Ингредиенты:
- 1 ст. л. соли;
- 4 ст. л. сахара;
- 1 ч. л. лимонной кислоты;
- 4 зубчика чеснока;
- 1-2 шт. гвоздики;
- 4-6 горошин чёрного перца;
- 1 лавровый лист;
- 2 зонтика укропа.
Как готовить:
- Сложите в банку пряности, большой пучок морковной ботвы и помидоры. Залейте кипятком доверху, прикройте крышкой и накройте полотенцем. Дайте настояться 30–40 минут.
- Слейте воду из банок в кастрюлю. Добавьте соль, сахар и лимонную кислоту, тщательно перемешайте и доведите до кипения.
- Разлейте маринад в банки, плотно закройте их и поставьте под одеяло на сутки. После этого помидоры можно убрать в погреб или на балкон.
Как видите, сохранить летние краски и ароматы на зиму не так уж и сложно. Готовые помидоры можно добавлять в салаты или супы, подавать в качестве гарнира к тушеному мясу или в качестве самостоятельной закуски.
Чтобы не потерять статью – сохраняйте ее в закладках. Также не забывайте делиться в соцсетях, чтобы ваши друзья тоже узнали секреты кухонного волшебства. Приятного аппетита и теплой зимы!
90000 Carrot Tops Vegetable Broth — A Easy Carrot Greens Recipe! 90001 90002 90003 90004 VEGETABLE BROTH made with carrot tops! This easy homemade recipe uses carrot greens to make a healthy vegetarian broth! Carrot leaves provide amazing health benefits so they’re great to cook with! 90005 90006 90007 90002 90007 90002 Ok, so you just picked your beautiful garden carrots! They are gorgeous! You grab the scissors and chop off the leafy carrot tops. And then it hits you — are you seriously just going to compost the carrot greens? 90007 90002 No way! 90007 90002 With gardening, you put so much love and energy into every single plant.Every single carrot has been nurtured. Every single carrot has been planted, one seed at a time. So with me, it breaks my heart to try not to use every bit and piece of that vegetable! 90007 Our fresh carrots just picked! 90016 What to do with carrot tops? 90017 90002 That’s how this recipe started for me. I was cutting off my carrot leaves and it hit me that I had to find a useful way to use them in the kitchen. And no, I do not mean some weird stir fry that tastes bitter. I mean, a seriously good recipe that will become used every garden season in your kitchen.So here it is …. 90007 90002 90004 Carrot Tops Vegetable Broth! 90005 Print this recipe out and add it to your recipe box! 90007 90016 Can you eat carrot greens? 90017 90002 Yes, carrot leaves are completely edible. Not only are they edible, but some European markets actually sell them! Carrot tops can be bitter in taste, so that’s where the confusion comes from. But long story short, you can eat them! 90007 90016 Ingredients for Carrot Tops Vegetable Broth 90017 90002 This soup broth recipe is so easy, I can almost 100% guarantee that you have all the ingredients! 90007 90002 First up, you’ll need carrot tops.Any amount of carrot tops can work, and I will help you with the math to show you how much broth you can make with it (see that below). 90007 90002 90007 90002 Besides carrot tops, you’ll need water, salt and bay leaves. See, I told you you had all the ingredients! 90007 90002 The first step is cleaning your carrot tops. Most likely your leaves have dirt all over them, and we really do not want to cook that in our broth. You can clean it in the sink, but I like to easily clean my greens in my 90004 salad spinner 90005.The salad spinner is great (it’s my must have Summer tool!) And cleans all our vegetables so quickly! 90007 90002 90007 90016 Carrot Greens Vegetable Broth Recipe 90017 90002 Add the carrot tops to a 90004 large pot 90005 along with water, salt and bay leaves. 90007 90002 This recipe is 1: 1, that means 1 cup of water to 1 ounce carrot tops. So if you have 8 ounces carrot tops, add 8 cups of water. If you have 2 ounces carrot tops, add 2 cups of water. Get it? 90051 90007 90002 Bring the water and carrot tops to a boil and then cover with a lid and let simmer for 1 hour.90051 90007 90002 After an hour, you’ll see how much they have broken down. 90051 90007 90002 And do you see that beautiful broth underneath? Yup, that’s delicious vegetable broth waiting for you! 90051 90007 90002 The amount of vegetable broth this makes depends on how many cups of water you start with. In general, during the simmering process you will lose 1/2 — 1 cup of water. So for example, for the 8 cups of water I used, this made 7 cups of vegetable broth. 90007 90002 90007 90002 Once the broth is made you can use immediately in a recipe, or save it for later on.If you’re saving it, I recommend freezing it in freezer bags. When you want to use it, just take it out of the freezer and defrost it. 90007 90002 Looking for more broth ideas? Make Vegetable Broth with 90004 Broccoli Leaves! 90005 90007 90016 Recipes Using Vegetable Broth 90017 90002 Here’s some of my favorite recipes that can use Carrot Tops Vegetable Broth! 90007 90002 Vegetarian Collard Greens 90007 90002 Stuffed Pepper Casserole (substitute the beef broth with this!) 90007 90002 Cheesy Vegetable Soup 90007 90002 Cauliflower Pot Pie 90007 90002 Roma Tomato Soup 90007 90002 Kielbasa and Cabbage (substitute the chicken broth with this!) 90007 90002 90007 90016 Carrot Peel Use Recipes 90017 90002 Want to go one additional step with the carrot love? If you have carrots that are freshly peeled, you can add the peels to your broth too! 90007 90002 I hope you all enjoy this Carrot Tops Vegetable Broth! Happy gardening and happy cooking! 90007 90002 Pin for later: 90007 90002 90007 90016 Carrot Tops Vegetable Broth 90017 Print 90002 VEGETABLE BROTH made with carrot tops! This easy homemade recipe uses carrot greens to make a healthy vegetarian broth! Carrot leaves provide amazing health benefits so they’re great to cook with! 90007 90002 Cook Time: 1 hour 10 minutes 90007 90002 Total Time 1 hour 10 minutes 90007 90108 Instructions 90109 90110 90111 90002 Add water, carrot tops, salt and bay leaves to a large pot.Bring to a boil. 90007 90114 90111 90002 Once boiling, cover with a lid and turn to low. Simmer for 1 hour. 90007 90114 90111 90002 Pour the broth through a colander, catching the liquid broth in a bowl below. Discard (or compost) the carrot tops. 90007 90114 90111 90002 You can use the vegetable broth immediately or freeze for later use. This broth is great in any recipe that calls for vegetable broth! 90007 90114 90127 90108 Notes 90109 This is a 1: 1 ratio recipe. For example, I’m using 8 cups of water to 8 ounces of carrot tops.If you have 4 ounces of carrot tops, use 4 cups of water. 90108 Nutrition Information: 90109 90002 Calories: 5kcal 90007 90002 Course: Soup 90007 90002 Cuisine: American 90007 90002 Keyword: carrot greens, carrot tops, vegetable broth 90007.90000 Roasted Carrots with Pistachio Carrot Top Pesto 90001 90002 90003 Roasted carrots with homemade carrot top pesto. This flavor-packed vegan side dish goes with just about everything and is the epitome of root-to-stalk cooking. 90004 90005 90002 90007 90007 90005 90002 Hi! I’ve missed this space! With several trips scheduled back to back, September and these first two weeks of October have disappeared before my eyes. While I love traveling (and can not wait to share my trip to Iceland and England with you!), It takes me at least a week or two to feel caught up and get back into a routine.So, I’m just going to get right to it. 90005 90002 We’re roasting carrots today! The weather has 90003 finally 90004 cooled down just enough for me to bust out the sheet pans. I’m excited about it. If you’ve followed my ramblings for even a short time, you know that roasted carrots are my thing. It is my go-to method for cooking carrots. The high roasting temperature and dry heat concentrates and caramelizes carrots ‘natural sugars, and they become quite addictive. 90005 90002 Roasted carrots add heft to main courses, such as this roasted carrot lentil salad, and they can quickly be transformed into soup, such as this incredibly easy (accidentally vegan) garam masala carrot soup! I’ve even jazzed up them with fun things like tahini sauce and pomegranate arils.These roasted carrots with carrot top pesto are my latest creation, and it might be one of my favorite side dish recipes to date. 90005 90002 90019 90019 90005 90002 In order to make this recipe, you’re going to need to seek out carrots with beautiful leafy green tops! No bagged carrots, please. 90005 90002 A few years ago, I never would have bought carrots with the greens attached. I just did not get the point. Carrots with greens always looked more fresh and appealing, but if I did buy them — 90003 and I’m embarrassed to admit this now 90004 — the leafy green tops ended up in the trash more often than not.Gahh! Nooo! 90005 90002 When I first came across the concept of carrot top pesto (or well, carrot top anything!), It was a major lightbulb and smack-my-forehead moment. 90029 In many ways, carrot top greens are like parsley both in appearance, texture, and versatility, except 90003 carrot top greens actually 90004 90003 taste like carrot. 90004 90034 90005 90002 It seems like such an obvious statement, but it’s worth emphasizing! 90005 90002 90039 90039 90005 90042 Tips for Carrot Top Pesto 90043 90002 One of my favorite ways to use carrot top stems is for homemade pesto.If you’ve never used carrot top greens before in a recipe, this recipe is made for you! You get to have your carrot top leaves and eat them too. 90005 90002 Unlike traditional Italian pesto, this carrot top pesto does not contain any cheese and is made with a simple combination of carrot top leaves, shelled pistachios, garlic, lemon zest and juice, and olive oil. The pistachios complement the roasted carrot flavor incredibly well. The pesto is light, bright, and is tasty enough to eat by the spoonful.90005 90002 The key for carrot top pesto is to find carrot top leaves in very good shape (avoid or discard any bruised leaves or stems!), And washing the leaves very well to remove any dirt or sand. Carrot top leaves do not store well for extended periods of time in the fridge, so I strongly suggest preparing the carrot top pesto in advance if you are planning ahead. 90005 90002 90051 90051 90053 90053 90005 90002 In this recipe, the roasted carrots are gently tossed, warm right out of the oven, with the carrot top pesto.It transforms an otherwise plain and traditional roasted carrot side dish into something more exciting and substantial! 90005 90002 I love this dish concept, because it is the epitome of root-to-stalk cooking. There is minimal to zero waste involved, and it is a fantastic way to incorporate the healthy and nutrition-packed carrot leaves into your kitchen cooking repertoire. 90005 90002 90061 90061 90005 90002 It goes without being said, this concept can be applied to so many other dishes than roasted carrots.If you wish to save carrots for other uses (or simply serve them plain) or your carrot tops need to be used quickly, the carrot top pesto can could just as easily be tossed with grains, pasta, seafood or meat, or other vegetables. 90005 90002 You’ll never look at carrot top stems the same way again! 90005 90002 90003 Prep Time: 90004 15 minutes 90005 90002 90003 Cook Time: 90004 20 minutes 90005 90002 90003 Total Time: 90004 35 minutes 90005 90042 Ingredients 90043 90082 90083 90084 1.5 lbs (2 large bunches) carrots with fresh, green tops attached 90085 90084 1 tablespoon extra virgin olive oil 90085 90084 1/8 teaspoon kosher salt 90085 90084 freshly ground black pepper 90085 90084 1/4 cup shelled pistachios, plus a few for garnishing 90085 90084 1 large peeled garlic clove 90085 90084 1 cup loosely packed carrot top leafy greens 90085 90084 zest of 1 lemon 90085 90084 2 tablespoons freshly squeezed lemon juice 90085 90084 2 tablespoons extra virgin olive oil 90085 90084 kosher salt 90085 90084 freshly ground black pepper 90085 90108 90042 Instructions 90043 90111 90084 Preheat the oven to 425 degrees Fahrenheit with a rack in the center position.90085 90084 Trim the stems from the carrots, leaving roughly ¼-inch stem attached. Set aside 1 packed cup of carrot top leaves for the pesto, discarding any tough or bruised leaves and stems. Save a few additional carrot leaves for garnish. Rinse and scrub the carrots well. Pat the carrots dry with a clean kitchen towel or paper towels and carefully slice in half lengthwise. 90085 90084 Place the carrot halves on the sheet and toss with olive oil, salt, and pepper. Distribute the carrots evenly across the sheet pan, leaving space between them.90085 90084 Roast the carrots, flipping them halfway through, until they are caramelized and just fork tender, roughly 18 to 24 minutes depending on the thickness of your carrots. 90085 90084 As the carrots are roasting, prepare the carrot top-pistachio pesto. Rinse and dry the carrot top greens to remove any grit and dirt. Pulse the pistachios and garlic in the bowl of a food processor. Add the carrot stems, lemon juice, lemon zest, pinch of kosher salt, and freshly ground black pepper. Pulse several times, scraping down the sides of the bowl with a rubber spatula as needed.Add the olive oil and two tablespoons warm water (this will help thin the pesto to make it easier for tossing!) And process until mostly smooth. Season to taste with salt and pepper. 90085 90084 Toss the still-warm roasted carrots with carrot-top pesto (you’ll have some extra pesto, which can be stored in an airtight-container in the fridge!). Serve on a platter and garnish with carrot top leaves and chopped pistachios. Serve warm or at room temperature. 90085 90124 90042 Notes 90043 90127 Tips for Success: 90128 90083 90084 Feel free to double or triple the pesto recipe if you have leftover carrot top greens.Place the pesto in an container, cover with a thin layer of olive oil, and refrigerate for 5 to 7 days, or freeze and defrost later! The pesto would be great as an appetizer dip, tossed with pasta, or served with seafood or meat. 90085 90108 90002 90134 Nutrition Information: 90135 Yield: 4 Serving Size: 1 90136 90003 Amount Per Serving: 90004 Calories: 159Total Fat: 11gSaturated Fat: 1gTrans Fat: 0gUnsaturated Fat: 9gCholesterol: 0mgSodium: 303mgCarbohydrates: 17gFiber: 6gSugar: 6gProtein: 2g 90005 90003 Posted in: 90004 All Recipes, Cuisine, Dairy Free, Diet, Dips and Spreads, Fall, Gluten Free, Healthy and Light, Holiday Dishes, Season, Sides, Vegan, Vegetable Side Dishes, Vegetarian .90000 Carrot, Tomato & Coconut Soup — Green Kitchen Stories 90001 90002 90003 90004 90002 And just like that, we are a family of four. Little Isac is one week old tonight. Luise gave birth to him in our home. He was delivered under water and into the arms of the bravest, strongest and most beautiful mother I know. Isac is a cute and calm little fellow that spends his days grunting around on our chests, eating and then dozing away in sleep. We are spoiling him with hugs and kisses and eventually we will also spoil him with home cooked food that makes him a healthy and strong plant eater.Thank you so much for all your cheering comments on Instagram, we are so happy to feel your support and love. Now take a look at this lovely little bug. 90004 90002 90008 90004 90002 We could go on and on about him forever, but we actually also have a new recipe for you. It is almost tradition for us to create a new yellow / orange soup every year. We have done lentil soups, sweet potato soups, pumpkin soups and orange soup. Today we are sharing this warm, smooth and creamy carrot soup spiked with tomatoes, coconut milk and turmeric and topped with a corn ceviche loosely inspired by one of Sprouted Kitchen’s recipes.The corn adds a really nice texture to the soup and a fresh twist in flavour. If you are looking for a recipe to start off autumn with, this soup is quite perfect. 90004 90002 90013 90014 90015 90004 90002 This is also a great recipe if you are on a budget. Carrots are always cheap to buy, but now, when they are in season they are extra frikkin ‘delicious. Make a huge batch of this soup and fill the freezer with it. I am sure we have mentioned this before, but it’s worth mentioning again: Using seasonal ingredients is a great way to eat good organic vegetables without paying a fortune.Plan what you cook after which seasonal ingredients that are cheapest. 90004 90002 90020 90004 90002 90023 Carrot, Tomato & Coconut Soup 90024 90025 Serves 4-6 90004 90002 90028 1 tbsp cold-pressed coconut oil or olive oil 90029 90025 90028 1 onion, chopped 90029 90025 90028 2 garlic cloves, chopped 90029 90025 90028 1 tsp ground turmeric (optional) 90029 90025 90028 10 medium size carrots, rinsed and sliced 90029 90025 90028 1 can (400 g / 14 oz) plum tomatoes or approx.5 chopped fresh tomatoes 90029 90025 90028 water, enough to cover 90029 90025 90028 sea salt & black pepper 90029 90025 90028 1 can (400 g / 14 oz) full fat coconut milk or any plant milk of choice 90029 90004 90002 Heat oil in a pot. Add onions, garlic and turmeric and sauté until soft and fragrant. Add carrots and tomatoes and cook for a minute or so, while stirring. Now add water, sea salt and pepper, cover and let simmer for 15-20 minutes until the carrots are tender. Meanwhile prepare the corn topping.When the soup is ready, use an immersion (hand) blender to puree until smooth. Stir in the coconut milk, taste and adjust the flavors. Serve the soup in bowls with a couple of spoonfuls topping and a drizzle of olive oil. 90004 90002 90023 Raw Corn Ceviche 90024 90025 90028 2 fresh corn cobs, husks removed 90029 90025 90028 4 sprigs flat-leaf parsley 90029 90025 90028 juice from 1-2 limes 90029 90025 90028 1 tbsp cold-pressed olive oil 90029 90025 90028 sea salt & black pepper 90029 90004 90002 Cut off the corn kernels from all sides.Chop the parsley. Place in a bowl. Combine all ingredients and season to taste. 90004 90002 90079 90004 90002 90028 Okay, just one last photo of him. Because those lips are made for kissing! 90029 90004 .90000 How to Grow Tomatoes and Carrots | Home Guides 90001 90002 Companion planting, although its beneficial effects are not scientifically proven, can help create a healthier ecosystem in your garden. Some vegetables, like tomatoes and carrots, complement each other’s growth habits. Tomatoes prefer summer warmth and plenty of sunshine, while carrots grow best in cooler soil. The tall tomato plants shade the soil, while the carrot’s full foliage provides a natural mulch that retains soil moisture and suppresses weed growth.Planting the two vegetables together ensures that both grow well and produce an ample harvest. 90003 90002 Spread 2 inches of compost and a balanced vegetable fertilizer, applied at the package’s recommended rate, over a well-drained garden bed in a location that receives six to eight hours of daily sunlight. Work the compost and fertilizer into the top 12 inches of soil. 90003 90002 Dig a planting hole for each tomato seedling. Make the hole deep enough to bury the stem up to the bottom set of leaves.Space the holes 2 to 3 feet apart in each row, placing the rows 3 feet apart. Set the tomato seedling in the hole, and fill it in with soil. Place a tomato cage over each plant. 90003 90002 Sow the carrot seeds 1 inch apart about 1 to 1/12 feet away from the tomato plants. Cover the seeds with a 1/4-inch layer of soil. 90003 90002 Water the tomato plants near their bases once a week, providing about 1 inch of moisture. Mist the soil surface between plants daily so it remains moist until the carrot seeds germinate.Then water the sprouted carrots at the same time you water the tomatoes. 90003 90002 Thin the carrots seedlings so that they stand 2 to 4 inches apart after they reach a 4-inch height. 90003 90002 Spread a 2-inch layer of mulch, such as straw, over the soil between the plants. The mulch retains soil moisture and prevents weed growth between the carrots and tomatoes. 90003 90002 Apply a soluble nitrogen-rich fertilizer when the tomatoes begin setting fruit. Water the plants with the fertilizer solution diluted to package specifications every two to four weeks.Rinse the foliage with a spray of clear water after fertilizing so that the fertilizer residue does not damage the leaves. 90003 90002 Harvest the tomatoes as they ripen and develop their full red color. Frequent harvesting can result in more fruit set. Harvest the carrots when the roots reach a 3 / 4- to 1-inch diameter, usually within 80 days of sprouting. Carrots can stay in the ground until the tomato plants begin to die back in fall, if desired. 90003.